SOAP UI is a
powerful and easy to use open source tool for automating different
types of web services like SOAP, REST etc. It provides a UI for
creating test cases, assertions making it easier to develop test
cases rapidly.
This article
covers basic steps and information on how to start with SOAP UI,
create basic test cases and assertions and execute the test cases.
Install
SOAP UI
Install the latest free version of SOAP
UI from http://www.soapui.org/
Create
a project
- Open SOAP UI.
- Click on file->new SOAP UI project


- Click on ok button.
- Add WSDL to the Project. Right click on Project (WebservicesTesting) ->Add WSDL.
- Provide the URL to the WSDL in the Add WSDL window and click OK. A service binding for the WSDL will be generated with all operations.


When the WSDL for a services changes, it can be updated without affecting the test cases by right clicking on the service binding and choosing update definition.

Generating test suite/test case
- Right click on the service binding and select “Generate Test Suite”. Select the operations for which sample test case template has to be generated and click on ok button. A test suite will be generated for the selected operations.


- Right click on the test suite to generate a new test case
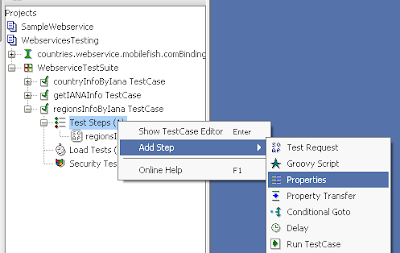
Adding
steps in a test case
When a new test
case is added, right click on the test case and select add step ->
test request. Select the operation for which the request needs to be
sent.
Once test case
is added, different steps to the test case can be added. These steps
form the blocks of the test case which are executed in order.
How
to pass parameters to tags
Values for the
tags in the SOAP request can be hard coded or parameterized. There
are two ways of doing passing parameters/values 1)
Creating properties to transfer values
2) Data driven by external files
1)
Creating properties to transfer values: Properties can be
used to store data. These can act as variables which can be passed to
the SOAP requests.
1.1)
Properties at a project: Properties can be defined at project and
these are available for all the test suites and all test cases.
a) Double click
on project and click on properties tab at the bottom to create
properties.

b) Enter
Property name in Add Property and Click on Ok button.


c) Enter Value to created property name at the bottom.

d) Pass created property value to the test suites/test cases in the Project.
e) Open the SOAP
Request of Test Case (countryInfoByIana) ->Right click on ianacode
value->Get Data->Project: [WebserviceTesting]->Property:[cntry]


f) Ianacode value is replaced by ${#Project#cntry} automatically.

g) Run the Script.
1.2)
Properties at the test suite level: Properties which are defined
at the test suite level are available for all the test cases and test
steps inside the suite. Double click on test suite and click on
properties tab at the bottom to create properties.
Follow the same
steps as in step 1.1.
1.3)
Properties at the test case: Properties at the test case are
available for only that test case and all the test steps inside the
test case.
a) Right click
on test case and select add step -> properties to create
properties for a test case.


b) Declaring properties using properties test step.

c) Transfer the property value to the Test Case. Right Click on ianacode value->Get Data->Property name (Ex: country)->Property(Ex:countryvalue)

d) Ianacode value change to ${country#countryvalue}

2) Data driven by external files: Is available only in the commercial version
Creating
assertions
Assertions are
at the heart of any test case where the actual testing happens
SOAP UI provides
different types of assertions. Double click on a test request inside
a test case. You will find an assertions tab at the bottom and
different kinds of assertions can be added.
XPath Match:
Step1: Select
XPath Match from Select Assertion window.


Step2: Click on ok button.
Step3: Enter the
Xpath Expression of the test case Response in Declare box.
Step4: Click on
Select from current.

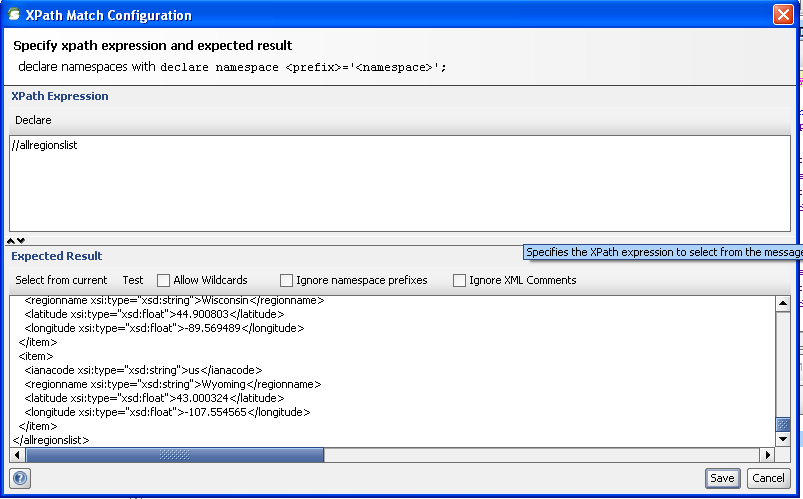
Step5: Click on Test to verify whether we are giving valid Xpath Expression or not.

Running the test cases
1)
Running from UI:
Double click on
a project or test suite or test case and click on run button to
execute tests at that level. Passed test steps in each of the test
suite are shown in green and failed ones in red.


2) Running from command prompt:
SOAP UI test
cases can also be run from command prompt by using the following
command
com.eviware.soapui.tools.SoapUITestCaseRunner
(options)
An easier way is
to run the tests is using the test runner batch file which comes
along with the SOAP UI installation at /bin
testrunner.bat
-sWebserviceTestSuite -j -f C:\SOAPUIProjects\Reports
C:\SOAPUIProjects\WebservicesTesting-soapui-project.
-s is for the
test suite
-j indicates
that junit style HTML report will be generated
-f is for
specifying the folder for report generation
Mentioning the
location of project XML is mandatory


3) Running from ANT:
An ANT target
can be created which executes this command line task to integrate
with the builds.
<target name="RunSOAPUISuite">
<exec executable="C:\Program
Files\SmartBear\soapUI-4.0.1\bin\testrunner.bat"> <arg
line='-sWebserviceTestSuite -j -f"C:\SOAPUIProjects\Reports"
"C:\SOAPUIProjects\WebservicesTesting-soapui-project.xml"'/>
</exec> </target>
Build.Xml


JUnit Report:

Importing the test cases
The test suites
and projects can be exported and imported to different machines and
thus can be shared and executed by other team members very easily as
it provides the same view on import.
Thanks much for nice post:
ReplyDeleteI have few queries, please help me to solve:
1. I have downloaded SOAP UI, it asks new soap project, new rest project, new generic project, what is the difference between three?
2. Which URL is this that we enter in step 5 "Provide the URL to the WSDL in the Add WSDL window and click OK. A service binding for the WSDL will be generated with all operations."
3. Restful API is also a webservice?
This is one awesome blog article. Much thanks again. selenium Online course Hyderabad
ReplyDeleteThis is my first visit to your web journal! We are a group of volunteers and new activities in the same specialty. Website gave us helpful data to work. בוחן עצמי
ReplyDeleteYeni Perde Modelleri
ReplyDeleteMOBİL ONAY
Turkcell mobil ödeme bozdurma
Nft Nasıl Alinir
ANKARA EVDEN EVE NAKLİYAT
trafik sigortası
Dedektör
web sitesi kurma
Aşk Romanları